Grafting Cactus: A How to GuideWords you may need to knowSterilize: Making something extremely clean and free from any bacteria/fungus etc. Root stock: The cactus you will use on the bottom, that is being used with roots to help the other grow. Scion: The cactus you will be placing on top of another, in hopes of increased growth. IntroductionThe main reason for grafting cacti, is to get faster growth. Some species are incredibly slow (and rare) and grafting is a good way to propagate them faster. It is especially useful when trying to obtain seeds. Because grafting increases growth so much, it may also make the cacti scion (top) grow funny or unlike a seed grown plant. Some root stocks make the scion more "deformed" looking than others (Pereskiopsis is notorious for this). ConsiderationsBefore grafting one must realize there is risk in doing this. You are, in fact, cutting your cactus in half. There is the risk of them getting infected, or making a bad join and having the scion, or worse, the scion and root stock, die. Be sure you are willing to risk your plants, and be sure you are ready to try grafting. Stay clean and work fast and steady and things should be OK. | |
Materials you will need- A healthy actively growing root stock - A healthy actively growing scion of similar diameter - Well lit, well ventilated workplace, a desk or table. - sharp razor blade. Thin sharp blades work best. - Rubbing alcohol 70%+ - Alcohol lamp and lighter (optional) - Tweezers (optional) - Tissue paper/cloth (clean) - Plastic bag, 2 liter pop bottle etc...see "After Care" - Rubber gloves |

|
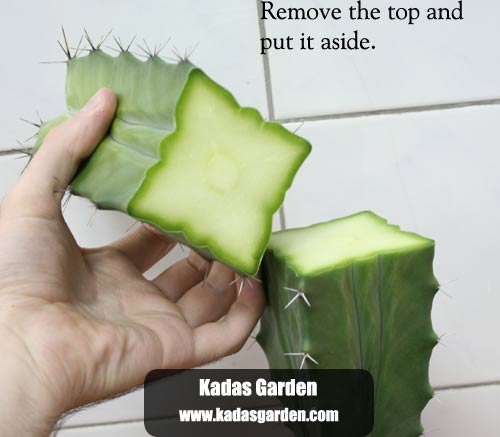
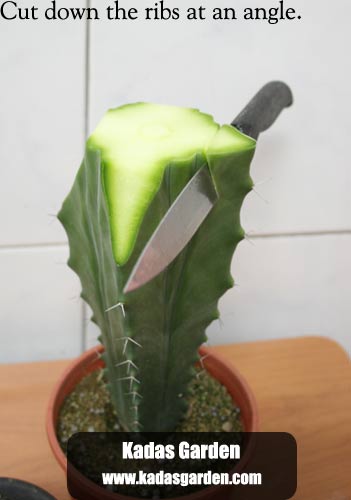
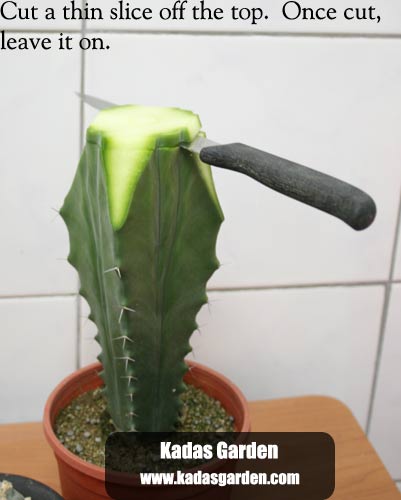
Getting startedWhen all your materials are ready, it is time to make the first cut. You want to make sure that both the root stock and scion are actively growing before grafting. First step is to cut the root stock. Cut it in a place that has grown this growing season, this will be softer juicier tissue...which is what you want. It is important to know that height is relatively unimportant. It is only useful to have taller stocks as that will absorb more light. Taller stocks, however, will pup much more and thus draw more energy away from the scion. What is really important is to choose a fast growing specie, and have a fat base. The fatter the stock, the bigger and faster the scion will become (in general). Making the CutThe first and most important part about grafting is keeping things sterile. We will only mention this once, so read it twice if need be. Use high proof alcohol (we use 95% ethanol) to sterilize all your materials. Knife, table, forceps, gloves etc. We often sterilize after each cut, but be sure to let the alcohol evaporate before cutting. Once you have decided where to cut, cut the stock as flat as possible and place the top cut to the side (you can root it later). Once the top is removed, it is time to ct the ribs back a bit. You want to do this for a couple reasons. The main reason is, when the cactus starts to dry (callous) the inner flesh will shrink a bit as it dehydrates, while the skin will stay rigid. This will cause the inner part to sink while the outer edges (skin) stay high. This will ultimately lead to the stock separating itself from the scion. With the ribs cut back you are also cutting away the skin at the top of the root stock, allowing it to dry and shrink more evenly. The other reason for cutting down the ribs a bit is to prevent it from sending out new shoots. Some cacti species like to send out shoots from the top, and because cacti ALWAYS have new shoots from where the spines are located, it is beneficial to remove the upper ones. Now that it is been cut and the ribs at the top beveled there is one more cut on the stock to make. Cut a thin (1-5 mm) slice off the top and leave it on until you are ready to attach the scion to the stock. We do this because if the flesh starts to dry before the 2 cacti are connected, they may not heal together. we want them wet and juicy when joining them, that way when they dry they will dry connected together. This process should look something like below. 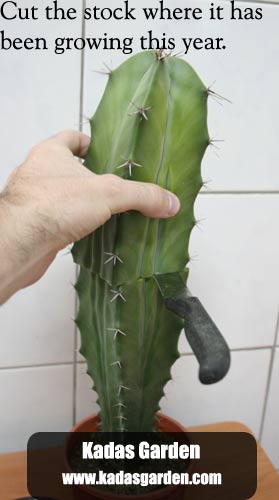
Once your root stock is cut, it is time to cut your scion. This is a much easier process. Simply cut the top off, making sure to leave some spines (areoles) on the roots so that the plant can make more shoots. If you cut the scion off the roots without leaving any spines, it will not be able to produce any new off shoots and will basically sit as is until death. We tend to cut the scion around half way up, but be sure to leave the scion thick enough to be grafted. 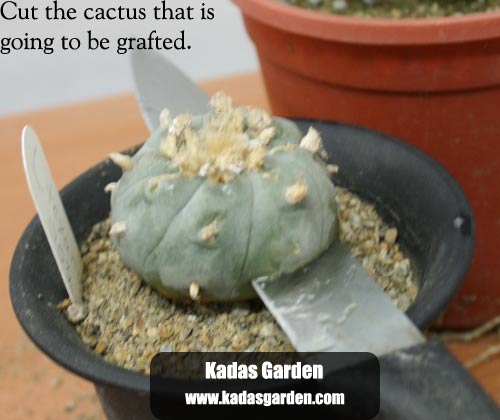
Joining them togetherWhen looking at the photo above of the cut Lophophora williamsii you can see a "ring" in the center of the cactus made of little "dots". These are the vascular tissue that you need to join with each other. Cacti stems are mostly made up of water storage tissue (parenchyma tissue) with the vascular tissue usually up the center in a ring type pattern. These vascular tissues will carry the nutrients and water from the roots to the plant, this is why it is needed to line them up. You will also notice smaller vascular tissue going form the main stem out to each areole, making grafts to areoles possible as well. In short, the more of this tissue you line up between the 2 cacti, the more nutrients/water will get passed and ultimately the graft will grow faster. Even if only a tiny bit connects, over time they may expand their connection. Both cacti are cut and it is now time to join them together. This step requires a steady hand, patience and speed. You do not want either of the 2 to start drying before joining them together (this is the reason for cutting the slice n the root stock). First take off the slice you cut on the root stock. This should reveal a juicy fresh like cut that has not yet started to dry. You will notice a ring in the middle, this is like the water pipes for your house, these will deliver nutrients and water to your scion. You will also notice this on your scion (in fact all plants are like this, just look different depending what group). It is important to line these rings up when joining them together. If these rings do not line up, almost no water or nutrition will be passed from roots to scion, so it is important that at lease part of these 2 rings touch. See the diagram below. 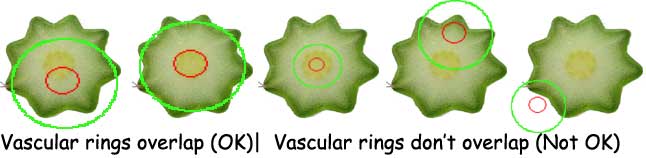
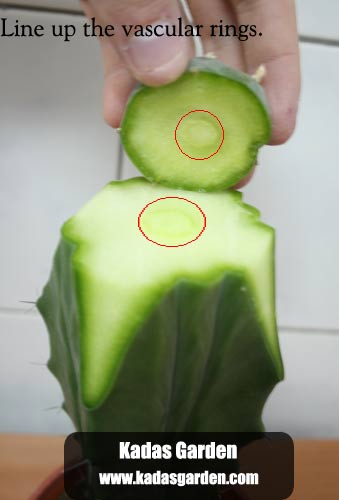
Once you have lined up the rings and placed the scion on top, press down lightly to try and remove any air pockets between the 2 cacti. Again, you want the 2 cacti to dry and heal together as one. 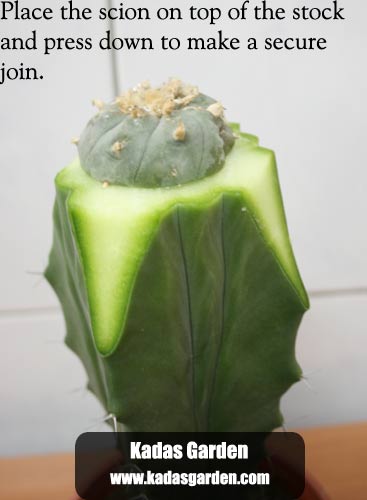
Once you are happy with the join, take a piece of tissue or foam or similar (breathable) material and place over the scion. Use electrical tape to tape down the scion firmly to the stock (do not use much force or you may crush the scion). We use electrical tape because it is very stretchy and that is very important when grafting. Scotch tape, masking tape, packing tape are all useless with this grafting method. Some people also use string and weights, which is -ok- for smaller grafts. I find that with weights the chances or the 2 separating are greater. In my opinion, electrical tape is the best thing for medium to large cacti grafts. 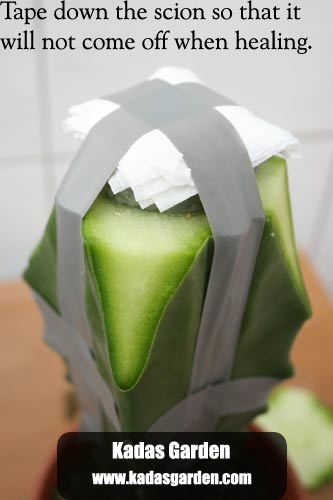
Exceptions to the rule! Strictly stating that if the 2 vascular rings (root stocks and scions) don't line up, the graft will die is a bit of a myth. In fact this rarely happens due to the fact that there are many more vascular rings other than the big one in the center. There is also at minimum one bundle going to EVERY areole (where the spines are), usually more. As long as any of these areas are cut open and connected to another cut open one on the other plant, the graft will work, although generally grows slower than if connected well to the main ring in the center! Here is a picture of an Ariocarpus fissuratus cut in half to show the vascular tissues, notice they dry out raised and harder? Keep that in mind when grafting. Other species are not so easy to tell. 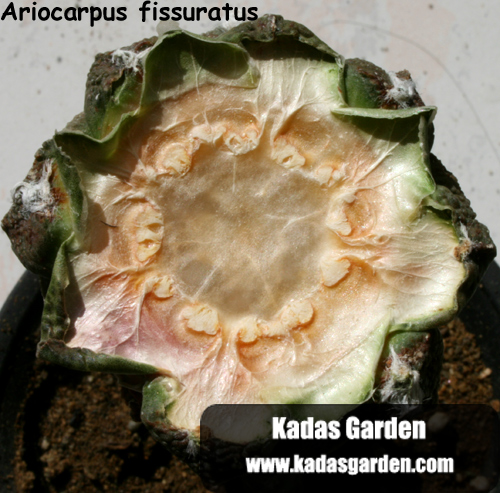
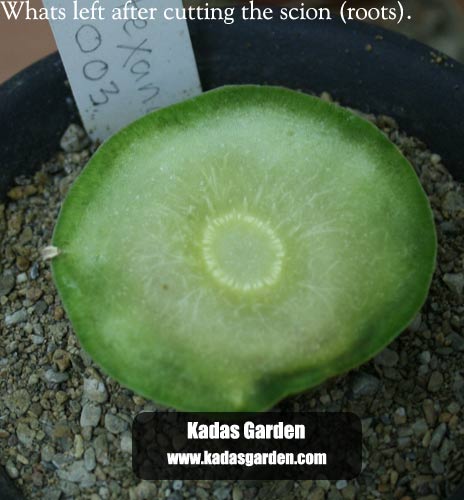
After careOnce the graft is taped together it is time to put it in a warm medium lit place. We often choose places that are dark and place a few fluorescent lights over top. We now keep ours in about 50%+ humidity for about a week (depends on species) then slowly acclimate them to drier conditions over 2-3 weeks before putting them with the rest of the cacti outside (or in your greenhouse/grow room). As for your cut top of the root stock and the base of your scion, keep those. we dust those with sulfur powder so they dry more flat. We root the top of the root stock to use again as a grafting root stock at a later time (once the roots n it are strong). The base of your scion is still alive and will only take time before putting out new shoots. Here is the base of the cut scion of a Lophophora williamsii. Before and after being dusted with sulfur powder.

Acclimating grafts to outdoors.When you first make your graft and tape it down you must keep it in lower light conditions and sometimes a little more humid. The goal is to slowly take them out of their protected environment and put them back outside. | |